Friday 24 July 2015

Flower Pressing

For as long as I can remember I have pressed flowers. 
As a child I loved preserving blooms by squashing them between the pages of books, and then later on I bought a little wooden press decorated with birds and blossom. The papery, two-dimensional results lasted for years. I used them to decorate cards and make pictures for relatives. After university when I worked in an office I made pressed flower bookmarks and cards and sold them to my colleagues. For Christmas cards I sprayed pressed leaves with metallic paints and used ferns as stencils. I seem to remember they were quite popular.
I've carried on pressing flowers on and off over the years, and this week decided it was time again to do some more, so I wandered around the garden gathering blooms. It's important to do this on a dry day so that they're completely dry and fully open.


There were some late aquilegias and tiny wild strawberry leaves,


frothy green alchemilla, lilac scabious and dark, dark geranium phaeum,


inky-purple clematis and umbelliferous (love that word) bronze fennel.


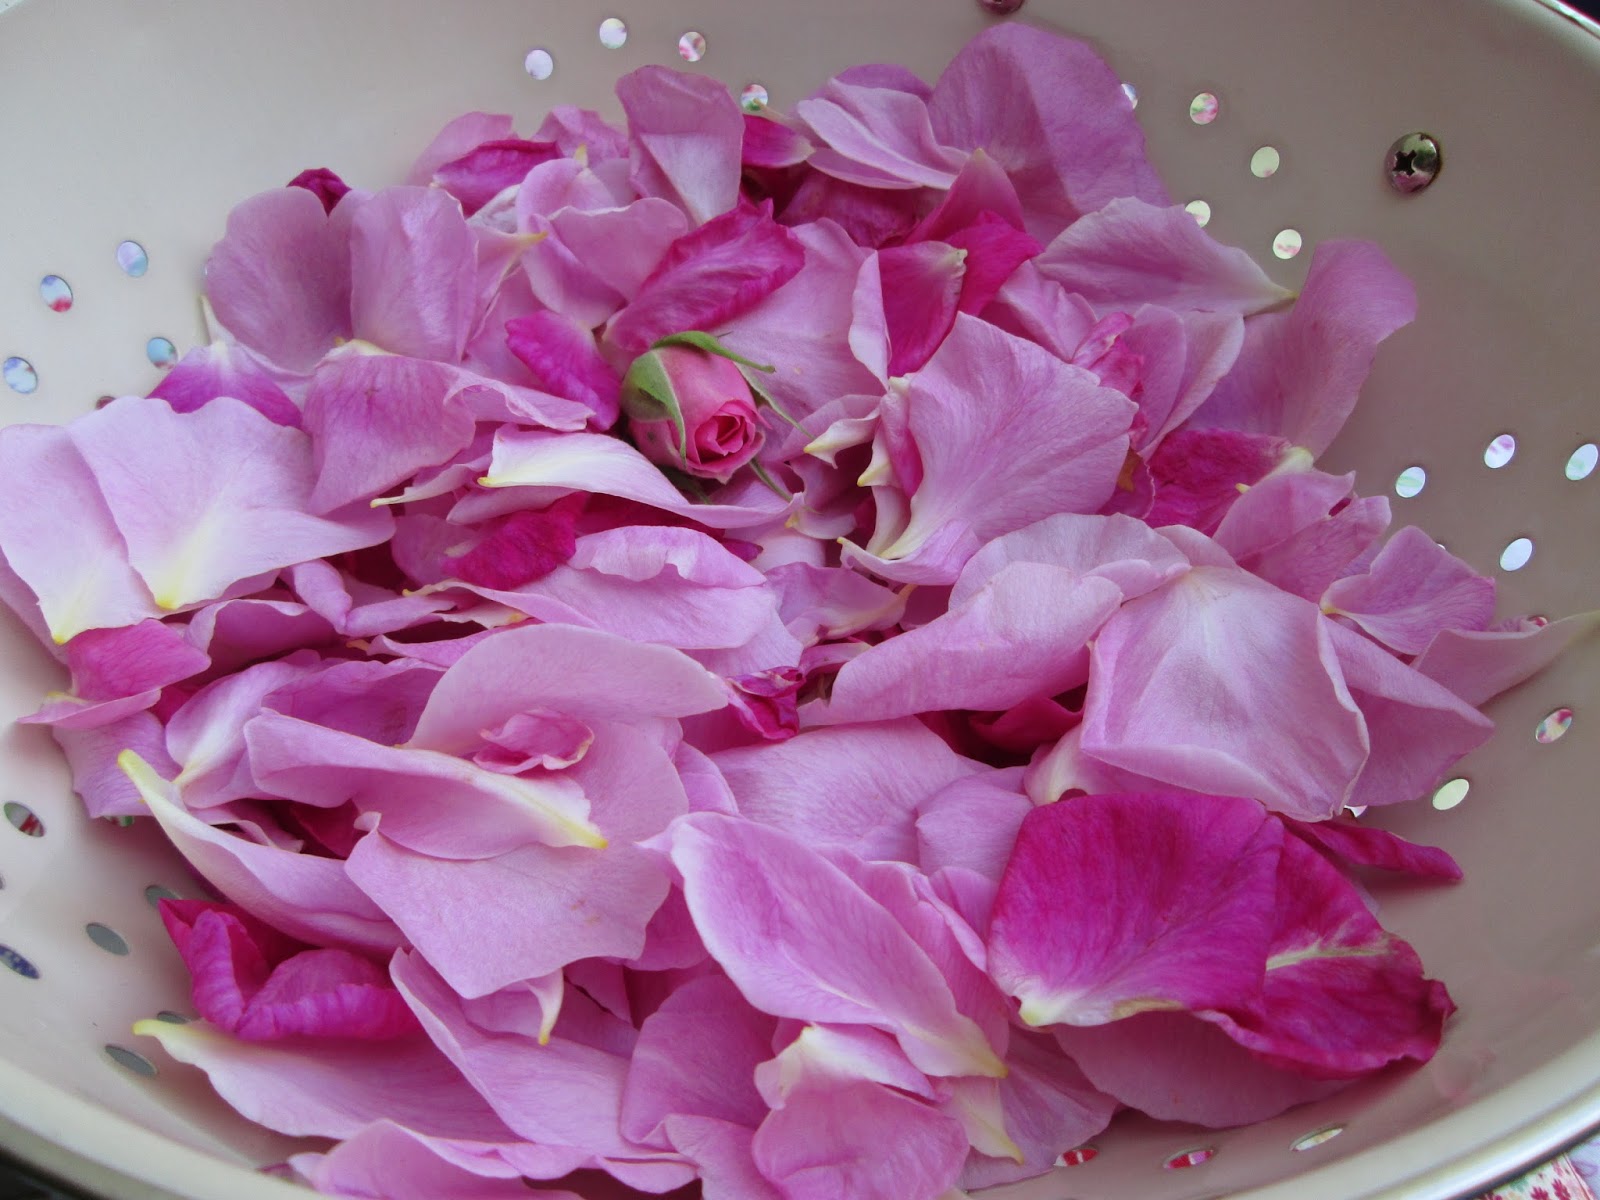
I started off by making a layer of cardboard and then one of paper. The cardboard must be thick and not corrugated (as this leaves imprinted lines), and the paper must be white and quite absorbent. Blotting paper is perfect. I arranged these tiny pink 'Fairy' roses upside-down with their stalks cut off, allowing plenty of room between each flower.


After another layer of paper, cardboard and then paper again I placed the clematis blooms.


More paper, cardboard and paper ... you get the idea. This time the aquilegias on their sides and the geraniums face up. I find that the flowers' shapes will dictate how you place them. The secret is not to have really thick, fleshy plant material as it won't dry easily during the pressing process.


Next layer, scabious heads. The blooms need to be handled gently to avoid damaging them.


Now tiny, neat strawberry leaves.


Alchemilla snipped into little florets.


Umbrellas of fennel, ready to splay out into mini explosions. 


Some more closed, placed side-on for a different perspective.


Finally the remaining layers of paper and cardboard piled up on top.


Next came the wooden top with the screws upwards in each corner.


And now time to press down very hard to get the wing nuts on and tightened. If, like me, you've really filled up the press you many wonder if they'll fit, but they will (I have been known to stand on it while I tighten it!). After a couple of days I tighten again, as the flowers will have had time to dry out and lose some bulk. It was now time to leave it for at least two weeks.


Here's a large press my dad made for me years ago when I was making cards to sell. I stencilled it at the time with bluebells.


This book is very inspiring, suggesting lots of imaginative pressed flower projects.


It's full of useful tips and lots of ideas like this plant diary, a page of pressed flowers and leaves for each month of the year.


Some of the designs are quite complicated, like this sumptuous herbal.


And others are more simple, like this pretty little card.


And others are unusual. I have pressed seaweed in the past, and it keeps its shape and colour well.


I like the fact that flower-pressing is a bit of a gamble: you never know how the finished product will turn out. I shall let you know in a couple of weeks!

Thursday 23 July 2015

A Change of Gear

It's been a good start to the summer hols for me. After the madness of the last weeks of term, work has finished and we have time to relax. I always find it tricky changing gear so suddenly and adapting to a new pace, but now that we're coming to the end of the first week I'm feeling that I've got into the swing of more relaxed days. As always I have a good-sized list of jobs that I plan to accomplish over the summer. As always about a half of these will actually get done!
It is nice to get out and about on the lovely warm days we've been having lately, so on Sunday all five of us went to the Bristol Harbour Festival for the afternoon. It was hot and sunny and there were crowds of people milling around. We went last July too. The sky and water looked so wonderfully blue on a cloudless day.


I liked the fact that this boat had a garden on board. I assume they move the pots when they set sail ...


Here's the beautiful Matthew looking as glorious as ever. It's a replica which is smaller than the original, but it's pretty impressive nevertheless.


We also watched a flyboarding demonstration. I didn't even know this was a thing, but I must say it was amazing! I could've watched for hours as people in wetsuits whizzed high into the air above the river on nothing but jets of water, only to dive head-first in perfect arcs in and then out again.


Back on dry land many stalls selling food from around the world beckoned. The continental sweets on this stall were very attractive indeed, but I remained strong and didn't buy any.


And this sold different kinds of olive oil. It was all quite crowded and hot, and we were flagging by now.


In the main square there was a stage and many refreshments stalls with a music-festival atmosphere going on - lots of people sitting on the grass drinking cider and beer. With the festival taking up a large part of the centre of Bristol there was too much to fit into one afternoon, so we sat on a bench in the shade for a little while.


On the way back we stopped by the BBC Weather tents to watch volunteers having a go at presenting a weather forecast in front of the camera. It looked quite difficult. The coloured umbrellas were a nice touch.


Yesterday my friend J and I spent a lovely day in Wells together wandering around the market and having lunch, and today D and I went shopping to Bath for the afternoon. I didn't take my camera to Wells and today's shopping trip was quite hectic, but we did find time to visit D's favourite cafe where I had a coffee and she had a beetroot cleanser and this delicious cake, artfully photographed by the girl herself. Delicious.


Whilst shopping I spotted these two books which were both drastically reduced - how could I pass them by? A lovely crochet book full of step-by-step crochet stitches and little projects, and a beautiful anthology of bird-themed poetry. They were such a bargain that they came home with me instantly. I know I'm going to enjoy them both.


Saturday 18 July 2015

... And Relax

Well, we've made it to the end of term here at The House With The Blue Door. Phew. D has finished her school year and so have I. I'm not sure who's more tired - the students or the staff! Ahead of us lie six whole weeks of summer holidays - hooray! It always takes me a few days to get into our new routine as the last days of term are so busy, so it takes a while to slow down and breathe. Yesterday evening's glass of wine in the garden was a good start.


We're at that time of year when the evenings are long and warm on a fine day, and despite some very humid and overcast weather this week, there's been some sunshine here and there. This morning was beautiful, warm with blue skies, and as I went into the garden to hang out the washing I felt very happy indeed.


I picked some raspberries and lavender while I was out there. My shed is calling to me. I'm planning on spending a good deal of creative time out there this summer.


I gave the flower beds a much-needed weed and then put some cosy blankets on the bench and sat under the apple tree for a while with a bit of crochet. I'll show you what I've been up to a bit later.


Our back garden is set apart and we can't see it from the house. We have a small paved area by the back door and as well as a small table and chairs, there are pots and containers which make a sort of little garden area. I pop out to pick the herbs for cooking, but there are also some colourful annuals too. Here are a few of them. The pelargoniums are at their best, as are the nasturtiums. I do love those round leaves.


This petunia couldn't be much more cheerful with its fabulous lilac trumpets.


And I'm really enjoying the deep, rich red of this pelargonium.


Best of all is this little passion flower 'Violacea'. I bought it in a supermarket in the spring for under £2, and am thrilled with its fabulous purple flower. I plan to put it in the garden, but it's tender so I'll have to think about where to put it over the winter. At the moment it's very happy in its pot.


Indoors on our dining table a bunch of Sweet Williams is filling the room with summer. I love to buy these gorgeous flowers every year. Relations of pinks and carnations, they have a faint clove-like scent and make me think of traditional cottage gardens.


Finally I shall share with you these rather lovely traditional 'British pudding' sweets. I'm not generally a fan of sweets, but these are so pretty they caught my eye. They come in three flavours: Eton Mess, Cherry Bakewell and Lemon Meringue, and have a bit of a 'retro' feel. They taste nice too.


Now I plan to put my feet up and spend a while catching up on blogs, and replying to all your lovely comments. See you soon x

Monday 13 July 2015

Rose & Lavender Shortbread

I haven't baked in ages while we were without a kitchen, so I decided that it was time to make something in our new oven. I perused my cookery books and wondered what it would be. It would have to be one of my regular, favourite cakes or biscuits. I considered a fruit loaf, a sponge, some madeleines, muffins or buns ... hmmm, maybe some cookies or flapjacks? In the end the choice turned out to be obvious, governed as always by the season. Rose or lavender shortbread. As you know, I love flowery things, and this extends to cooking with flowers too. The lavender is well and truly out now, and many of the roses have finished flowering. I would need to get my skates on, as my traditional annual bake was in danger of timing out. 


I duly snipped myself a bunch of lavender ready for cooking with and drying, and stripped off the tiny flowers from a handful of stems.


Despite most of them being over, a few roses are still flowering well.


I picked some Mortimer Sackler blooms, a delicately-scented rose.


And also some flowers from William Shakespeare, which is has a lovely strong fragrance.


I washed the petals and took off the part where they join the stem,


then gathered together the ingredients, 


and chopped the rose petals.


I creamed the butter and sugar and then divided it into two, adding the chopped petals to one half.


I then added half of the flour to this along with two teaspoonfuls of rose water, and mixed it into a dough.


Then I did the same with the lavender flowers, adding them to the other half of the creamed butter and sugar, followed by the rest of the flour.


I now had two equal quantities of dough, one rose and one lavender. I rolled it into little balls and flattened them on a greased baking tray, marking them with the back of a fork. I used to add a sprinkle of caster sugar to the tops of the biscuits, but I think they're already quite sweet enough so don't bother now.


Here they are after baking, rose on the left and lavender on the right. I can't make my mind up about which I like the best. They're both delicious.


I made them a few days ago, and already they've gone, scoffed by my family. Think I might have to make some more!

*******

If you're interested in making them, here's my recipe which I adapted from this one. I usually make a double quantity.

Rose or Lavender Shortbread

Ingredients:

100g caster sugar
200g butter
300g plain flour
2 tsps rose water
large handful of rose petals
(for lavender shortbread omit the rose water and petals and use instead 2 large tbsps of lavender flowers)

Method:

1) Cream together the sugar and butter until light and fluffy, then mix in the rose water. 

2) Wash the petals, removing the bitter white base, and chop into small pieces. Mix these into the creamed butter and sugar.

3) Add the flour and mix together to form a dough.

4) Chill for 30 mins in the fridge.

5) Either roll out to 1/2 cm thick and cut into shapes, or roll into walnut-sized balls and flatten.

6) Place on a greased baking tray and sprinkle with a little caster sugar (optional).

7) Bake at GM 4/180 C for about 20 mins until firm to the touch, but still pale in colour.

8) Leave to cool on a wire rack.


Enjoy them with a cup of tea!